Text Definitions |
 
|
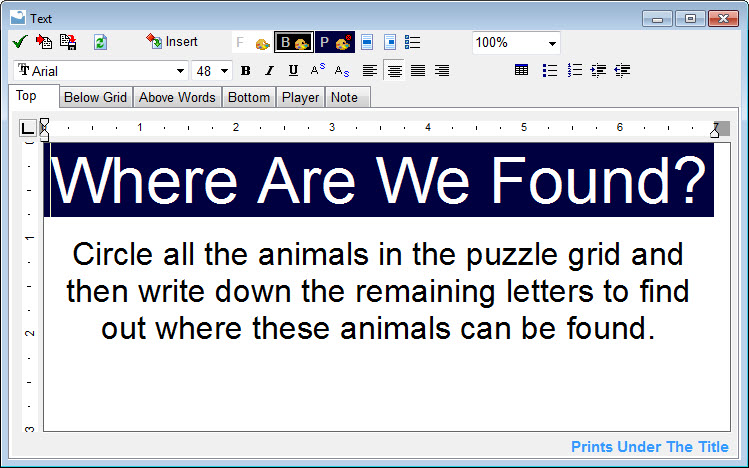
Pressing the TEXT toolbar button, selecting the Text Paragraph item under the File menu, editing a Note during the Publish HTML, or clicking the TEXT button during a Print Preview will display the Text Paragraphs window. This window is used to edit text paragraphs that will be placed on the puzzle page when printed or exported.

![]() is used to close the Text Definitions window.
is used to close the Text Definitions window.
![]() is used to load definitions.
is used to load definitions.
![]() is used to save definitions.
is used to save definitions.
![]() is used to refresh the Print or Java Applet Note previews when used from the Print Preview feature.
is used to refresh the Print or Java Applet Note previews when used from the Print Preview feature.
There are six tab pages. Each holds a different text paragraph. The first four define text that will be used when printing or export graphics depicting puzzles. The last two are used to add notes that display on the computer screen.
Top is text that will appear at the top of the page when printed or exported. Normally the title will be displayed here along with any instructions to people playing the puzzle.
Below Grid is text that will appear below the puzzle grid.
Above Words is text that will appear above the word list. If the word list is placed on a second page, then this text will appear on that second page.
Bottom is text that will appear at the bottom of the last page of the puzzle.
Player is used to enter text you would like displayed when the puzzle is used within interactive puzzle players. These will display both with the Java Applet Player that is distributed using the Publish HTML feature, and the Windows Word Splash Puzzle Player software.
Note should contain notes about the construction of your puzzle that you would like to be displayed every time the puzzle is edited with Word Splash Pro. Notes exist for all the sample puzzles to help you learn how they were constructed.
Typing Text
Text is typed into the text areas just as you would in a word processor. When entering text you can use the Key Typer utility, spell checking, and the clipboard functions of the Edit menu.
To change the text formatting use the format tools on the toolbar.
To change existing text formatting you must select that text. Selecting is a feature of Windows. To select text you can click the left mouse button at the start of where you want to select and drag the mouse across the text with the mouse button still down. Release the mouse button when the desired text is selected. The selected text will be left highlighted. You can also double click on words to select them, or triple click to select sentences. Another way to select text is to hold the SHIFT key down and then move the cursor through the text with the arrow and paging keys. Using the CTRL key while pressing the arrows will move by full words.
If no text is selected then any formatting changes will start where the cursor is currently positioned. Simply change the text style and start typing.
Working Display Size
![]()
The display size selection allow changing how the text is viewed on the screen as you edit. You can choose to fit it to the width of the editing area, or use a specific zoom percentage. Set it to a size that allows you to see enough of the text paragraphs at the same size as you need. You may also wish to make the Text Paragraph window larger by dragging the edges of the window with the mouse, or using the Maximize button at the top right of the window.
Note that each text paragraph may have a different ruler width. This space is determined by the currently formatted page and the position of the grid and word list on the page. For example, if the word list is next to the grid on the page then the Above Words text paragraph will only be as wide as the area reserved for the word list next to the grid. So, before entering text paragraphs you may want to assign the position and size of the grid and word list so that you can review how the text will look in it's final position on the page.
Insert Into Text
![]()
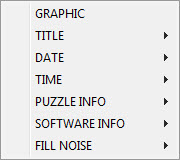
Use the INSERT button to insert predefined text and objects or graphics
into the text.

If inserting a GRAPHIC you will be asked to select a BMP or WMF file from your harddrive.
Titles can be entered as editable text or as live objects that change when the TITLE back on the main window are changed.
The date and time can also be inserted as text or live objects that update each time the puzzle is printed or exported.
The Fill Noise feature can be used to place formatted text into the form to be used to solve the Noise Fill portion of the puzzle.
Colors
For more information on how color selection works see the Color Selector section.
![]()
Use the F color button to select the font color. This is the color of the text itself.
![]()
Use the B color button to set the text background color. This only places the color behind the formatted text itself. Once a color is selected it can be reset to transparent by pressing the small red X button that will be shown at the top right of the color selection box.
![]()
Use the P color button to set the current paragraph's background color. The color will be applied to the entire width of the paragraph. Once a color is selected it can be reset to transparent by pressing the small red X button that will be shown at the top right. of the color selection box.
Format Dialogs
![]()
Displays the Paragraph Format window.
![]()
Displays the Tabs window.
![]()
Displays the Bullets window.
Font Properties
![]()
The font selector can be used to change the font name being used. Simply select from the list of fonts on your computer. If you intend to share your puzzle files with other Word Splash Pro users or on other computers make sure the fonts are available on all computers.
![]()
The font size selector allows you to change the size of the text. Select from the list or type a number in.
![]()
The font property buttons allow you to turn font attributes on and off. Use these toggles to control Bold, Italics, Underline, Superscript and Subscript attributes. You can apply multiple text attributes to the same text area.
Paragraph Alignment
Use the paragraph alignment buttons to align the text. Only one can be set for any text area.
![]() When set the text will align to
the left of the entire area.
When set the text will align to
the left of the entire area.
![]() When set the text will be centered
on the entire area.
When set the text will be centered
on the entire area.
![]() When set the text will stretch
to fill the entire area.
When set the text will stretch
to fill the entire area.
![]() When set the text will align to
the right of the entire area.
When set the text will align to
the right of the entire area.
Undo and Redo
![]() Use this button to undo your
last change.
Use this button to undo your
last change.
![]() Use this button to reapply
a change that was removed using the undo button.
Use this button to reapply
a change that was removed using the undo button.
Tables
Tables allow creating structures of rows and columns. You can place text and graphics into the table cells to position them in their own rectangular area of the page.
![]() The table button will display the table create drop-down
utility.
The table button will display the table create drop-down
utility.

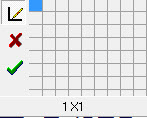
Size the table by clicking on the grid cells until the table has the number of rows and columns you want to create. The table size will be listed at the bottom.
Three buttons exist on the left. When the first one is down lines will be drawn around all of the table cells when the grid is created. If you do not want lines then press it again to turn this feature off before the table is created. Table properties can also be changed after the table is created using the Table Editing buttons. The second button is to cancel the table create. The third is to create the table.
Table Editing
The table editing features are available by clicking on the table with the right mouse button. You will be shown a pop-up menu to choose from the many table editing actions.
The following buttons with the same features as the pop-up menu will be available if the "Use Table Editing Tools on Text Window" is set on the General Options window.
![]()
The table row buttons can be used to insert and remove rows from an existing table. Simply locate the cursor marker in the row you wish to start with and press the button.
![]()
The table column buttons can be used to insert and delete columns from an existing table. Simply locate the cursor marker in the row you wish to start with and press the button.
![]()
The table cell buttons can be used to split an existing table cell into two columns, or to combine the current and next cells into a single cell. Use these to create tables that are not simply rows and columns, but instead sets of cells each their own width.
![]()
The line drawing tools can be used to add and remove lines from the current table cell. Simply press the buttons to add and remove the lines for the currently selected cell or cells.
Indentation
Indenting works on entire paragraphs.
![]()
Use this button to add a level of indentation.
![]()
Use this button to remove a level of indentation.
![]()
Use this button to add bullet marks to the front of the indentation. You can choose the type of indentation using the Bullet Dialog button listed above.
![]()
Use this button to number the paragraph. It can be used to create entire numbered lists. You can choose the type of numbering using the Bullet Dialog button listed above.
Tabs
A ruler exists above the text entry area. You can use this ruler to add tab marks for indentation and centering. Tabs are used when the Tab key is pressed on the keyboard or justification is applied in any other way. To add a Tab marker simply click on the ruler where you would like the tab to be placed and a marker will appear. To remove a tab click on the existing tab mark again.
You can change the type of tab you will place by first clicking on the box in the top, left corner where the horizontal and vertical rulers meet. Each time you press on the box it will change to a different tab mark. Stop when you have the one you want.
![]() Left Justified
Left Justified
![]() Right Justified
Right Justified
![]() Center Justified
Center Justified
![]() Decimal Place Alignment
Decimal Place Alignment